Build A Calculator in React
Build A Calculator in React

This project is part of the freeCodeCamp react certification program.
In this React Project tutorial, we will learn how to build a simple calculator using JavaScript React framework.
TASKS TO ACHIEVE IN THE PROJECT
- The calculator should contain clickable element with an 'Equal to' sign (that is, an = symbol ) which has an id of "equals".
- There should be ten clickable elements having one number each from 0-9 with the following corresponding IDs :
- id="zero", id="one", id= "two", id="three", id="four", id="five", id="six", id="seven, id="eight" and id="nine"
- There will be four clickable elements each having one of the primary mathematical operators with the following corresponding IDs:
- id="add', id="subtract", id="multiply", id="divide".
- There will be one clickable element with a decimal point symbol with the corresponding id of "decimal".
- There will be a clickable element with a corresponding id of "clear"
- There will be an element to display values with an id of "display"
- At any point of time, pressing the clear button clears the input and output values and returns the calculator to its initialized state; 0 should be showing as element with id of display.
- As input numbers I should be able to see my input in the element with an id of display.
- In any order, I should be able to add, subtract, multiply and divide a chain of numbers of any length, and when I hit =, the correct result should be shown in the element with the id of display.
- When inputting numbers in the calculator, it should not allow a number to begin with multiple zeroes.
- When decimal element clicked, , 0. should append to currently displayed value. two. in one numbers should not be accepted.
- I should be able to perform any operation (+,-,*,1) on numbers containing decimal points.
- If 2 or more operators are entered, consecutively, the operation performed should be the last operators entered(excluding the negative (-) sign. example, if 5+ *7 = is entered, the result to be 35(that is 5*7); if 5*-5 = entered, the result to be -25 that is (5*(-5))
- Pressing operator immediately following = sign should start a new calculation that operates on result of the previous evaluation.
 <div id="app"></div>
<script src="https://cdn.freecodecamp.org/testable-projects-fcc/v1/bundle.js"></script>
EXPLANATION OF HTML CODE
In the above code we can see that the entire App has been stored inside the div container with an id of 'app' and this is usually the standard convention for creating React Apps.
MAKING THE NUMBERS AND OPERATORS
Getting started with the coding of doing the numbers and operators for the calculator:
   const numbers = [7, 8, 9, 4, 5, 6, 1, 2, 3, 0]; const operators = [ '/', '*', '-', '+']; const ids = {  7: 'seven',   8: 'eight',   9: 'nine',   4: 'four',   5: 'five',   6: 'six',   1: 'one',   2: 'two',   3: 'three',   0: 'zero',  '/': 'divide',   '*': 'multiply',   '-': 'subtract',   '+': 'add'}


  class App extends React.Component {  state = {    lastClicked: undefined,    calcResult: '0',    operation: undefined  }      handleClick = (event) => {    const { calcResult, lastClicked } = this.state;    const { innerText } = event.target;        switch(innerText) {      case 'AC': {        this.setState({          calcResult: '0',        });        break;      }              case '=': {        const evaluatedResult = eval(calcResult);        this.setState({          calcResult: evaluatedResult        });        break;      }              case '.': {                const splittedResult = calcResult.split(/[\+\-\*\/]/);        const lastResult = splittedResult.slice(-1)[0];                if(!lastResult.includes('.')) {          this.setState({            calcResult: calcResult+'.'          })        }                break;      }              default: {        let event = undefined;        // check for other op      if(operators.includes(innerText)) {          if(operators.includes(lastClicked) && innerText !== '-') {                        const lastNumberIdx = calcResult.split('').reverse()                .findIndex(char => char !== ' ' && numbers.includes(+char));                     event = calcResult.slice(0, calcResult.length - lastNumberIdx) + ` ${innerText} `;          } else {            event = `${calcResult} ${innerText} `;          }        } else {          event = (calcResult === '0') ? innerText : (calcResult + innerText);        }                this.setState({          calcResult: event        });      }    }        this.setState({      lastClicked: innerText    })      }    render() {    const { currentNumber, calcResult } = this.state;    return (      <div className="calculator">                <div id="display" className="display">          {calcResult}        </div>                <div className="numbers-container">          <button            className="ac" /*black ac */            onClick={this.handleClick}             id="clear"            >            AC          </button>                    {numbers.map(number => (            <button              /* className={`black ${number === 0 && 'bg'}`} */              key={number}               onClick={this.handleClick}              id={ids[number]}             >             {number}            </button>          ))}                    <button            /* className="grey" */            onClick={this.handleClick}             id="decimal"           >            .          </button>        </div>        <div className="operators-container">          {operators.map(operator => (            <button               className="op"               key={operator}               onClick={this.handleClick}              id={ids[operator]}             >              {operator}            </button>          ))}                    <button           /*  className="gray" */            onClick={this.handleClick}             id="equals"           >            =          </button>        </div>      </div>    )
  }
}
ReactDOM.render(<App />, document.getElementById('app'));
BUILDING STORAGE FOR STORING NUMBERS AND OPERATORS
We need a variable to store numbers in the calculator, so we create a variable called const numbers and if you see carefully, the numbers have been arranged and stored in this variable in a particular order, just as it appears in a calculator.
const numbers = [7, 8, 9, 4, 5, 6, 1, 2, 3, 0];
As you can see above, the order is 7,8,9, followed by 4,5,6 and that is followed by
1,2,3,0 below in the last line. I suggest, you keep a real life calculator if you have one
at home, right infront of you while doing this project, or just save a picture of a
calculator from google while doing this project, so as to be able to visualise the
project better.
We have all the operators being stored in operators, you can see a divide symbol (/),
a multiply symbol(*), a subtract symbol(-) and an add symbol (+)respectively.
As part of this project challenge, we have been asked to allocate specific id to every operator and number stored in this calculator. So we do that by storing all the ids in the variable id like this :
So, I hope, you have understood the project until here, quite easy, and it may get more complicated as it gets more complex later on in here. But, keep reading and practicing until the end of this tutorial, so that you can understand it really well.
CREATING THE APP COMPONENT
Consider the code:
In the above code, we can see clearly that the last clicked element will be given an initial state of 'undefined' as we currently do not have any idea of what is going to be the last clicked element in the calculator based on the user performance.
The initial state of the calculated result, which is calcResult in our code will be given a value of '0' as again, in the initial state, there is no result or calculation done yet. The initial state of operation is given a value of 'undefined' since we are not sure what the user is going to perform in the calculator yet.
CREATING THE EVENT FUNCTION FOR THE APP
Next we create the handleClick event function using an arrow function with parameters calcResult and lastClicked values and give it a state of this.state which will give us the current value of the state of the calculated result and the last clicked items accordingly and we will set this event's target value as the value const{innerText}and as we already know in React, if we use this curly braces for a html element in javaScript code, it will be treated as a jsx element and will help to implement the javaScript script thereby. So, as a result of the event function that we created, we will be able to see the inner text of the calculator.
In order to evaluate the result of the calculator, we use the switch method in javaScript that we have learnt earlier in javaScript. If you have not already learnt the switch method, I will be doing another tutorial post on javaScript switch method. In switch method, what we do,is, take different scenarios of the elements or items that we press or click in the calculator, and what happens as an outcome in the different scenarios of user interaction with the different contacts with the various items or buttons of the calculator.
USING THE SWITCH METHOD FOR DIFFERENT CASES
'AC 'Button:
In the case that a user clicks on the button 'AC', we set the state of the inner text such that the calculated result or calcResult is set to zero value. The AC key in a calculator is actually the clear button or key that will clear all the values of the result when you press on it, hence, keeping this in mind, we set the state of the calcResult to 0 value in the case a user will click the 'AC' key or button of the calculator.
Next we consider a case when the user clicks on the key '=', and in this scenario, we store the value of the result of the eval() method performed on the calculated result or calcResult, in the variable const evaluatedResult. Then we set the state of the calcResult , that is the calculated result as the evaluatedResult.
Next, we consider the case when the user clicks on the decimal or '.' in the calculator device. We store the value of splitted result in a var variable and call it splittedResult. We split the rssult by using regex method.
'Equal to' Button
In this case , we use the eval() function to evaluate the string provided to calculate the value and return the completed value of the calculation. We set the state of the calculated result (representated as calcResult ), as the evaluated result represented by evaluatedResult.
'Decimal' Button
For considering the case of the decimal button, we first need to use the regex method as explained below:
USING THE REGEX METHOD
[ ] matches any one expression
\ escapes a special character
+ one or more
* 0 or more
/ is a special character which needs to be escaped or flagged by placing a \ before it toto nullify its effects.
"-" The minus sign indicates a range in a character class(when it is not at the first position after the "[" opening bracket or the last position before the "]" closing bracket
Example "[A-Z-]" matches any uppercase or "[-A-Z]" matches character between a and Z and or "-"
We can escape "-" character by using "\-"
So lets see whats happening with the regex here
/[\+\-\*\/]/
The pair // is for open and close regex string
The [ ] brackets matches any one expression in the regex string meaning escapes either an +,-,*, or divide symbol because you cannot have have more than one symbol in the end result.
The \+ escapes the plus (+) symbol
The \- escapes the minus symbol
The \* escapes the multiply symbol
The \/ escapes the division symbol
So, obviously, in the calculated result, for case of a decimal number as the result, right after the zero of the resultant number, you want to see only the resultant number as the result and you dont want to see operators and hence the use of regex string to escape the operators, plus, minus, multiply and the divide symbols respectively in the resultant output.
Next using the slice method, we isolate the last item of the result , which is why we use -1 that will slice the last item in the string of numbers. So after slicing the last item in the string, we then use the code syntax
const lastResult = splittedResult.slice(-1)[0];
By using the (-) we are able to slice the last character or item in a string. So, let us say,
we had a decimal number as 12.37 + 1.0 = 13.37, in the screen output,
n the result screen , then, after the regex splitting, we escape the plus symbol and
item in this string.
By using the [0] we mean the index of the first item in a string. So by using the code
const lastResult = splittedResult.slice(-1)[0];we get the index of the first item in the sliced result.
the equal to symbol and we also thereafter split the result and then slice this result
and then we use the split method to extract the last item in this string, which is
13.37 in this case and that is the obvious result for this scenario and slice the last
item.
Next we consider a condition when the lastResult does not include a decimal and in this case we set the state such that the calcResult will be actually the calcResult plus the the decimal as we want to get uniform result in the screen all the time, hope, you understood why. So if the result is 100 then the calcResult will be 100 + . or it means, 100.00 in other words.
After the break, we consider the default event whereby ;
USING THE IF-ELSE METHOD FOR EVALUATING DIFFERENT EVENT SCENARIOS
Let us consider an undefined situation where we check for other operators in the calculation process. Obviously we consider a condition when the operators includes and the innter text is not equal to a hyphen symbol; In this case case we need to split the calcResult and then reverse it and then find the index of the character such that the character is not equal to an empty string and numbers includes a plus character. The calculated result needs to be sliced using the slice method wherein the slicing starts from the first item to the item which is the subtracted result of the length of the calcResult and the index of the lastNumber and then we add this to the value of the innerText to show as output on the screen.
Else the event would show the value of the calcResult with the value of the innerText. If not either of the above situation, then the event would be using the conditional statement whereby if the calcResult has a value of '0' is true, then, the event should display innerText and if False, then, it would display the calcResult plus the innerText. So, we now set the state of the calcResult as the event and that of the lastClicked as the innerText.
In other words, setting the state means we update the value of the state to what we provide to it as the value. In the above case, we update the value of the lastClicked to innerText and we update the value of the calcResult with the value of the event.
Next, we consider the rendering part of the app:
CREATING A CONTAINER FOR DISPLAY
In the above code, lets see what is happening:
In the above code, it says this.state equals to some variable. this.state is the method that we access the state of the app from the render method as shown above in the code editor. So, it means that we can access the state of this app from the render method and it is going to be the variable storing currentNumber and calcResult.
In the return output, we create a container with a className of 'calculator' and inside this div container, we create another container with a div id of 'display' and className of ' display' and inside this container, we will implement the value of the calculated result, that is calcResult.
Below this container, we create another container with a className of 'numbers-container' as this container is meant to store the numbers of the calculator. Within this numbers container, we create a button with the className of 'ac' that as we know in a calculator is meant to clear all values from the display screen of the calculator. Now, this button that it does is , when the user clicks this button it should implement the handleClick event which we represent by {this.handleClick} and we keep the id of this button as 'clear' so that it can be identified as the button which is used to clear all the values from the display screen. We then mention the letters 'AC' between these open and closed button tags to say that the user will see the word AC on the calculator .
Note, we have mentioned calcResult in this container within a pair of curly braces and the reason that we used these curly braces here is for the code to implement the javaScript or jsx code here, so that React app will display the value of the calculated result or calcResult in this container which is meant to display the value of the calculated result.
USING THE MAP() METHOD ON THE NUMBERS FOR THE NUMBER BUTTONS
Explanation
As we already learnt in JavaScript earlier, map method is used for iteration of items . Here we use the arrow function shortcut to do the iteration over the numbers in the buttons. We iterate over the numbers, whereby every number of the button is iterated over by using the key of the button equal to {number} using the key of number, and id is equal to ids of [number] , note , here we show the number within square brackets to indicate that it is the index , since we show index within square brackets. so, we represent the id of every number using the different ids of individual numbers and again note we represent ids of number indices within curly braces to implement the jsx here, meaning, {ids[number]}
The button has an onClick function which is equal to this.handleClick in curly braces which will implement the onClick event whenever a user clicks on the button. Within the open and closed button, we write {number} , and you can see the number mentioned within curly braces here , this is done to implement the JavaScript mapping function for this button which has done the iteration over for the numbers in the number button.
Code for Implementing the Decimal Button
Explanation
The button displaying the decimal symbol has an id of "decimal" to make this button unique only to display the decimal symbol and has an onClick function that will implement the this.handleClick event when the event is fired. That means when the user clicks the decimal button, the onClick event will be fired and the user can use this decimal in the calculation.
USING THE MAP() METHOD FOR THE OPERATOR BUTTONS
Explanation
In the operators container, we have buttons that represent the operators of the calculator. We map the operators such that each of the operator will be grouped inside the operator button with a className of "op", a key equal to operator , and the handleClick function is passed to the button as an event handler. In this mapping method, each of the operator will be referred to by its specific id.
In between the open and closed operator button tags, we mentioned the operator within curly braces in order to implement the JavaScript function associated with the operator button here. In other words, by writing the operator within curly braces means JavaScript is processing and putting the inner value of that particular operator out there between the button tags for the user to see.
CREATING THE CONTAINER FOR THE 'EQUAL' BUTTON
Explanation
The handleClick function is passed to the equals button as an event handler. each of these buttons has an id of 'equals' so when the event is fired we can use the equal symbol button as shown above in the container of the equal symbol button in the operators container.
RENDERING TO THE DOM
In the above code, what is happening is that we are calling the App component by using the render method and by doing this code, we can inject the JSX into the DOM Node and then will update all the parts of the DOM that is required during the operation of the App. So, calling the render method will actually display the React App inside the browser of the DOM. In the code as you can see, the render method is taking two parameters, the HTML element and the html code. Please note that by convention, we call the element id as "root". The html code needs to be displayed in the root note. The root node is actually the container for carrying the React App. We dont necessarily need to call the id of the container as 'root' but it is just a standard convention to do so for the ease of doing the code , however, you are free to use any other term accordingly for this purpose.
The purpose of the function above is to show the required html code inside the particular specified html element.
In the DOM rendering code line above, we notice two parameters, the first parameter is the <App /> component that you want to render and the second parameter is the destination where you want to render this App component, and in this case, we want to render this App in the div container with an id of 'app' whereby, this div is the sole container for the App.
THE CSS CODE
* {box-sizing: border-box;}body {background-color: whitesmoke ;margin: 0;min-height: 100vh;display: flex;align-items: center;justify-content: center;}.calculator {background-color: whitesmoke ;box-shadow: 15px 5px 10px rgba(1, 0, 0, 1);display: flex;flex-wrap: wrap;padding: 5px;height: 400px;width: 250px;border:5cm black;}.display {color: whitesmoke;background-color:graytext;font-size: 30px;position: relative;padding: 25px 15px;text-align: right;height: 79px;width: 100%;border-radius: 2%;box-shadow: 5px 5px 10px rgba(1, 0, 0, 1);}.numbers-container {width: 75%;border:5cm black;}.operators-container {width: 25%;}button {border: none;border-radius: 15%;cursor: pointer;font-size: 24px;margin: 5px;height: 50px;width: 50px;border:2cm black;box-shadow: 5px 5px 5px rgba(1, 0, 0, 1);color:black;background:lightgray;}button.ac {border-radius: 5px;width: 110px;background :slategray;color:whitesmoke;}button.op{border-radius:15%;background:slategray;color:whitesmoke;}#equals{border-radius:5px;background:black;color:whitesmoke;width:90px;margin-left:-34px;}
STYLING THE APP
The CSS code is quite self-explanatory and I have kept it simple here for this project. We have flex display for the container with a class of calculator. For giving some realistic button feel, we have shadow effect for the buttons, but, it is really upto you , if you want to skip this step and just avoid as much css as possible to learn only the javaScript part first. We have given different colors to the AC button and the Operators buttons and the equals button, but, again, it is totally upto you if you want to provide different or same colors to these buttons.
SOURCE CODE IN MY CODE EDITOR
The full source code for my jsitor file: source code in my external code editor
The Calculator App in full view here
Other React Projects Guide:
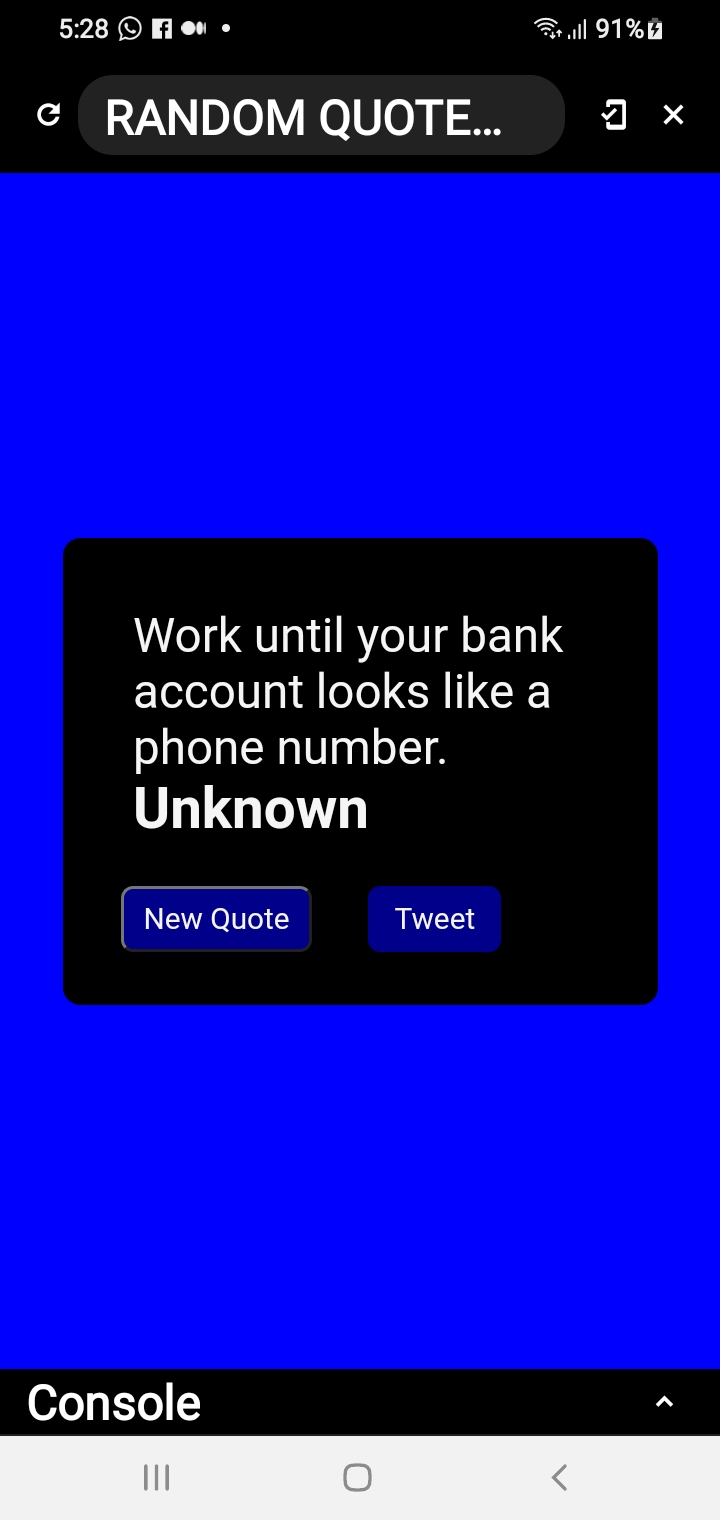
Build Random Quote Machine in React
Popular Posts You may find useful:
How To Remember Code In Your Learning Phase


Comments
Post a Comment